Saturday, 22 June 2013

Flower Ring

This design was inspired by my flower ring. I always get compliments when I wear the ring, so I thought it'd be neat if I replicated the flowers onto my nails!

The polishes I used were Essie Beyond Cozy, L'Oréal Golden Lucks, L'Oréal Tangerine Crush and a jelly cream Barielle polish. 

Golden Lucks is very similar to the gold outline on the ring, however the polish is quite sheer. Instead of outlining the flowers with Golden Lucks, I used it as a base colour then painted the flowers. I didn't want to use rhinestones like the ring for this design, so I simply painted Beyond Cozy between the flowers with a dotting tool.

I like the idea of accent nails, so I only painted the flowers on two fingers for both my hands. This way it won't look overwhelming and busy. Here's another view of my hand!

Monday, 10 June 2013

Needle Marble

I'm behind on my posts since my nails have grown out of this square shape and into an almond shape now. So let's get to it!

Of all the types of nail art, water marble is probably my worst; it never turns out well every time I try. Having said that, I was excited to hear about an alternative marble design without using water! This is the final look of my version of needle marble nails. 

The polishes I used were Ciaté Power Dressing and Ciaté Cabaret. Power Dressing is a mini rich dark blue that came with my Ciaté mini mani month. Cabaret is a creamy purple that came with my Velvet Manicure set. My favourite part about Ciaté polishes are the packaging; the bottes and bows (of course) are absolutely adorable!  

To achieve this look, I started with a clear base coat, followed by the Ciaté polishes depicted below. I applied thick layers of each polish and lightly swirled the two colours with a dotting tool.

The swirling from the dotting tool adjusted the level of the layers a bit, and for that reason I used Essie Good to Go as my topcoat to make the design glossy and smoother. 

I love how my pinky from my dominant hand turned out, so here's a closer picture.

Aaaand here are a couple more snapshots with my thumb!

Saturday, 26 January 2013

Polkadots and Florals

I couldn't have picked an easier combination to do than polkadots and roses! These were the first designs I practiced when I received my nail art brushes from eBay last year. Took me a few trials to finally master the technique.

The colours I used were China Glaze Tree Hugger, Essie Play Date, To Buy or Not to Buy, and Turquoise and Caicos.

I also used L'Oréal I Will (behind the four bottles) to highlight the roses. It's really simple, I applied little blobs of Play Date, then less blobs of I Will, swirled the colours together with a dotting tool (can be replaced with a toothpick), added Tree Hugger for the leaves, et voilà!

And finally, both hands! I used Essie Good to Go as my top coat cause it dries almost as fast as Seche Vite without the extra thickness. There's something great about the formula of Good to Go that somehow hides any flaws, like air bubbles or visible brush strokes, and I can go to bed a few minutes after and find zero bed sheet marks in the morning!


Thursday, 17 January 2013

NYE nails

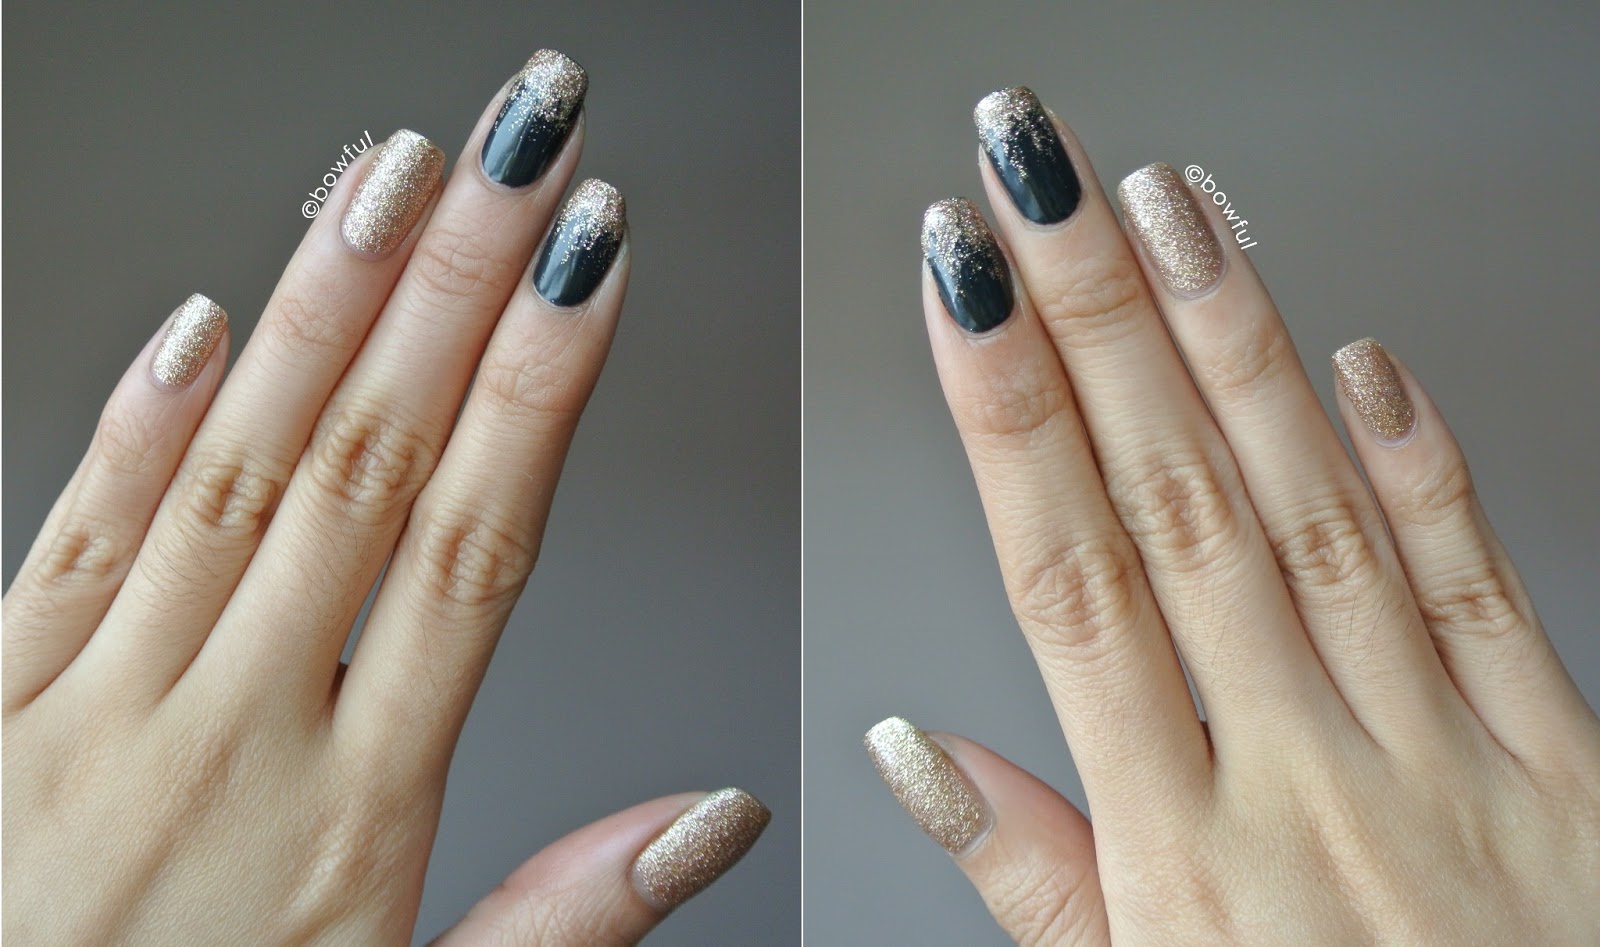
I got a new camera for Christmas (Nikon J1) and thought it'd be a good idea to start blogging my nail designs for the new year. So, I chose a glitter manicure to say adiós to 2012, and to start off 2013.

The polishes I used were CHI Ferry to Lady Liberty and China Glaze Champagne Kisses. I never knew there were CHI polishes until a lovely friend of mine gave me a couple as a gift. Ferry to Lady Liberty is a beautiful dark blue creme, although it looks black in some pictures. I love, love, love this CHI nail polish mostly because the formula made application a breeze.
These two were taken with my iPhone 4.

China Glaze Champagne Kisses immediately caught my eye when I saw a swatch in a salon, but I didn't buy it until I saw the blog post of The PolishAholic with several comparisons. Champagne Kisses wouldn't be my ideal glitter for gradients, but I couldn't resist its beauty! The name itself proved it was suitable for New Year's Eve. The glitter also matched my phone clutch for the evening.

I used Seche Vite top coat to finish since it's thick and works perfectly with glitter. I previously had almond shaped nails which explains the round corners on my index finger nails, so kindly ignore that! Here's both hands.

Monday, 7 January 2013

Testing 1, 2, 3

Yay, first post!!
I'm not making any promises that this blog will only be about nails.
I started this because I love painting nails and take too many pictures of each design.
Here's to hoping those pictures will be put to good use!